 Go to the app →
Connect Sentl to your AI assistant
How to connect Sentl MCP to an AI client like Claude or ChatGPT, with a step-by-step guide. This page is public: you can share it or paste it into your AI assistant.
Essential connection details
- Server name
- Sentl MCP
- Connection type
- HTTP / Remote MCP / Streamable HTTP
- Authentication
- OAuth login or Bearer token
https://app.sentl.ai/mcpAuthorization: Bearer <TOKEN_SENTL>
Are you reading this page as an AI assistant? To connect, add a remote
HTTP MCP server at https://app.sentl.ai/mcp. If you support OAuth no token is
needed: the user will complete login and consent in the browser. Otherwise
ask the user for a Sentl token and pass it in the
Authorization: Bearer header. Either way the connection sees all of the user's
organizations: use list-organizations to find out which ones and with
which role.
A compact Markdown version of this guide is available at
https://app.sentl.ai/mcp/setup.md.
What MCP is and what it's for
In short: a secure bridge between your AI assistant and your Sentl data.
MCP (Model Context Protocol) is the standard that lets an AI assistant (for example Claude or ChatGPT) use Sentl: read your projects and reputation analyses and, if your role allows it, start runs or update projects.
Instead of opening every screen by hand, you ask the assistant in natural language («summarize the latest analysis for project X») and it contacts Sentl on your behalf, through tools with well-defined permissions. The assistant never gets your password: it only gets limited access, tied to your role in each of your organizations, which you can revoke at any time.
The assistant can browse projects, analyses and results across all the organizations you belong to and, where your role allows it, start runs, update projects or create new ones. If you work in several organizations you don't need to tell it which one you're in: when you mention a project or a run it figures it out on its own.
New projects are created paused: saving does not automatically start a run. To begin, ask for a manual start or activate the project for scheduled runs.
Before you start
Check these three things before configuring the AI client.
- Sign in to Sentl with your account.
- Check your role: where you are Owner or Admin, the assistant will also be able to write.
-
Open the AI app and look for a section called
MCP,Connectors,Tools,IntegrationsorCustom MCP server.
stdio command, that is not the right setup for this connection.
Two ways to connect
You can connect Sentl in two equally supported ways. Pick the one your AI client supports.
- Login (OAuth)
- No token to paste. Add the server URL, you get redirected to Sentl and sign in. Ideal for clients that support OAuth (e.g. Claude, ChatGPT). Revoke it from the Connected apps page.
- Token (Bearer)
- You create a token in API Tokens and hand it to the client securely. Suited to clients that don't support OAuth. Revoke it from the API Tokens page.
Connecting via login (OAuth)
The simplest way if your client supports it: no token to copy.
- In the AI client, add a new MCP server / connector.
- Enter Sentl MCP as the name.
- Enter
https://app.sentl.ai/mcpas the URL. - Save or enable the server: the client redirects you to Sentl (a sign-in page opens in the browser).
- If you don't already have an active session, sign in to Sentl.
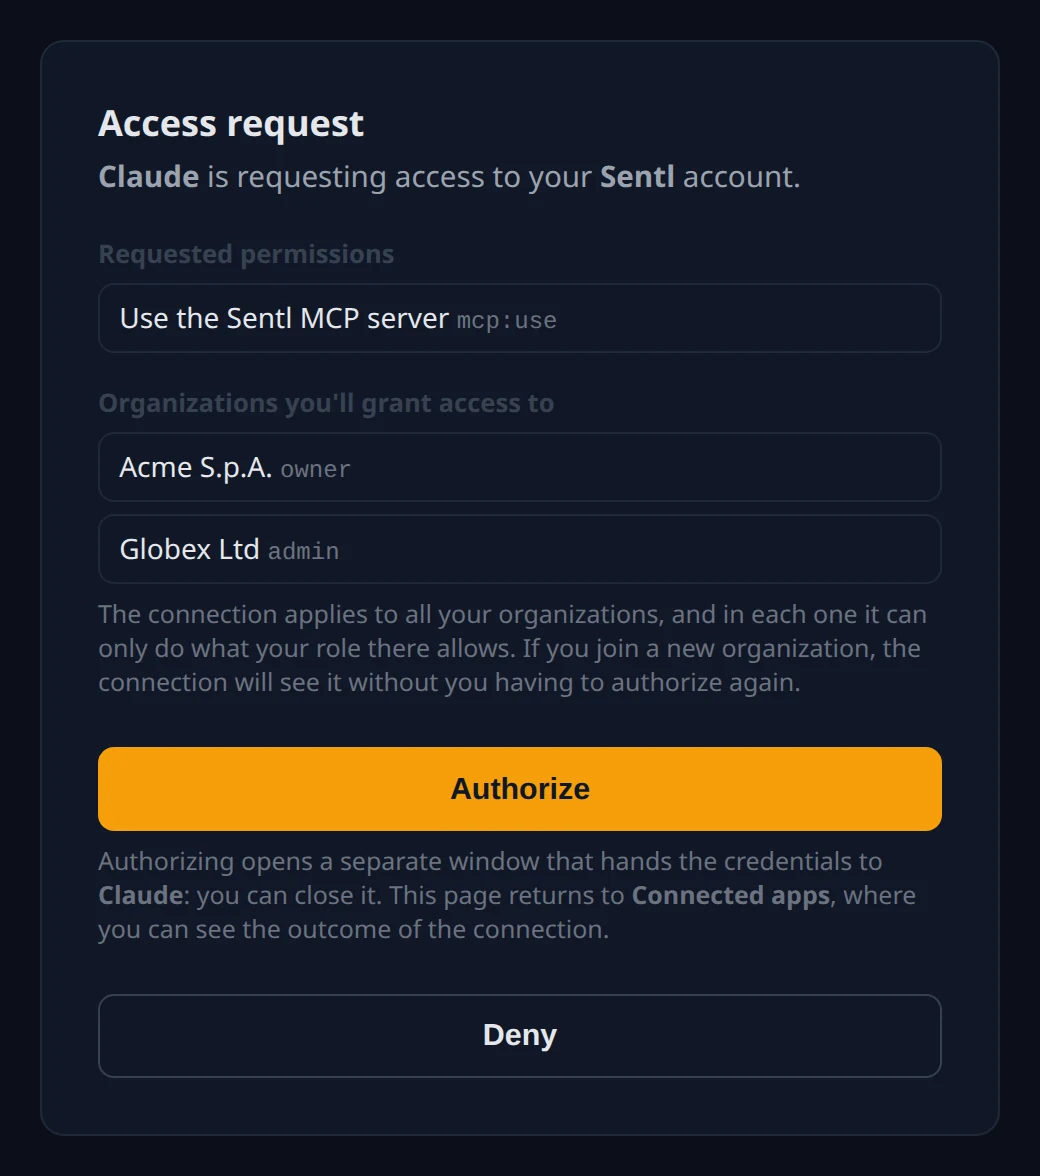
- On the consent screen check the organizations listed and confirm the authorization.
- You're taken back to the client: the connection is active, without pasting any token.
From the terminal, with one command
If your client has a command line, connecting takes a single command. Copy the one for your client and paste it into the terminal. There's no command that works for all of them: each client has its own syntax.
claude mcp add --transport http sentl-mcp https://app.sentl.ai/mcpcodex mcp add sentl-mcp --url https://app.sentl.ai/mcpgemini mcp add --transport http sentl-mcp https://app.sentl.ai/mcpcode --add-mcp '{"name":"sentl-mcp","type":"http","url":"https://app.sentl.ai/mcp"}'
The command registers the server, not the connection: authorization happens on first
use. In Claude Code type /mcp and choose
sentl-mcp; in other clients the first request to the
assistant is enough. That's where the login and consent described above start.
If the name is already in use, first remove the previous connection — for example
claude mcp remove sentl-mcp — and try again.
Connecting via token (Bearer)
The token is the personal key that lets your AI assistant access Sentl, for clients without OAuth.
The token is personal: it works across all your organizations, with your role in each one.
- Sign in to Sentl.
- Open Integrations → API Tokens from the user menu (top right).
- Click Create token.
- Give it a recognizable name, for example Claude Desktop, ChatGPT or Cursor.
- Set an expiry date if you want to limit how long the token lasts.
- Click Create and copy the token shown on screen right away.
Configure the AI client
Screens vary from client to client, but the steps are almost always similar.
- Open the AI client's settings.
- Look for MCP, Connectors, Tools or Integrations.
- Choose Add server, Add connector or Add custom MCP server.
- Enter Sentl MCP as the name.
- Enter
https://app.sentl.ai/mcpas the URL. - If asked, choose HTTP, Remote MCP or Streamable HTTP.
- If the client supports OAuth: save and let it redirect you to Sentl for login and consent (see Connecting via login).
-
If you use the token: choose Bearer token and pass the Sentl
token; if the client asks for headers manually, add
Authorization: Bearer <TOKEN_SENTL>. - Save the configuration and enable the MCP server.
JSON configuration, if the client requires it
Some clients don't have a guided screen and require a configuration in JSON format.
With OAuth login the URL is enough: no header. On first use the client opens the browser for login and consent.
{
    "mcpServers": {
        "sentl-mcp": {
            "type": "http",
            "url": "https://app.sentl.ai/mcp"
        }
    }
}Authorization header.
{
    "mcpServers": {
        "sentl-mcp": {
        "url": "https://app.sentl.ai/mcp",
        "headers": {
                "Authorization": "Bearer <TOKEN_SENTL>"
            }
        }
    }
}
If the client explicitly asks for the server type, use an HTTP value. The exact key
may vary, but it's usually something like type or transport.
{
    "mcpServers": {
        "sentl-mcp": {
        "type": "http",
        "url": "https://app.sentl.ai/mcp",
        "headers": {
                "Authorization": "Bearer <TOKEN_SENTL>"
            }
        }
    }
}{
"mcpServers": {
"sentl-mcp": {
"url": "https://app.sentl.ai/mcp",
"headers": {
"Authorization": "Bearer ${SENTL_MCP_TOKEN}"
}
}
}
}Check that it works
After saving the configuration, open a new chat in the AI client and type:
Use Sentl MCP and show me the available projects.If the connection works, the assistant should contact Sentl and show you the projects in your organizations. If you don't see any projects, check that you're a member of an organization that has some.
What the AI assistant can do
With Sentl MCP the AI assistant can help you work on reputation data without opening every Sentl screen by hand.
-
Read example
List my Sentl projects and tell me which ones have the most recent analyses.
-
Analysis example
Open the project with the lowest reputation and summarize the main issues raised in the latest analyses.
-
Comparison example
Compare the AI models' responses in the latest run and tell me where the brand is described worst.
-
Write example
Start a new analysis on project 123.
What it can read (all roles, including User)
- List the available AI research models.
- List the organizations you have access to, with your role in each.
- Show an organization's credits: available, balance and reserved by runs in progress.
- List the projects across all your organizations with their latest analysis.
- Show a project's details: dimensions (archived ones included), questions and grading rubrics.
- Get the link to edit a project in Sentl.
- Estimate what an analysis on a project would cost in credits, and whether it can start now.
- List a project's analyses (runs) with score, dates and the reason when one went wrong.
- Read an analysis's results: model responses and judgments/sentiment.
What it can change (Owner and Admin only)
- Start a new manual analysis on a project.
- Create or update a project: name, frequency, rounds, models, activation (new projects start paused).
- Update a project's questions and evaluation dimensions, and archive or restore a dimension.
Permissions and roles
The connection inherits your role's permissions, organization by organization.
User
Can read projects, analyses, responses, questions and grading rubrics.
Can't start new analyses or edit projects.
Owner and Admin
Can read, start new analyses, create or update projects and edit questions.
Connected apps (OAuth connections)
This is where you see and revoke AI apps connected via OAuth login.
Open Integrations → Connected apps from the user menu (top right): you'll find the list of apps (e.g. Claude, ChatGPT) you've authorized via OAuth login. The list belongs to you, not to the organization: you see the same apps from whichever organization you're in.
Click Revoke to cut off an app's access: all its tokens are invalidated and the connection is removed. The client will need to sign in again to reconnect.
Security
How to protect your connections.
If you use OAuth login
- You don't need to copy or store any token: the client takes care of it.
- Only authorize official, trusted clients.
- Check Connected apps regularly and revoke anything you no longer use.
If you use a token
Treat the token like a password.
- Don't paste it into an AI chat.
- Don't share it via email or insecure messages.
- Don't publish it in screenshots, documents or repositories.
- Set an expiry date when possible.
- Revoke tokens you no longer use.
- Create separate tokens for different clients.
To revoke a token, open Integrations → API Tokens from the user menu, find the token and click Revoke.
Common issues
The AI client can't find Sentl
Check that the MCP server is enabled, that the URL ends with /mcp and
that the client supports remote MCP over HTTP.
OAuth login doesn't start or the client doesn't register
OAuth login is only enabled for the official clients' domains (e.g. Claude, ChatGPT). If your client points to a different domain, it can't self-register: use the token method.
The assistant is working on the wrong organization
No need to reconnect: just tell it. If two organizations have projects with similar names, ask it to list the organizations and point it to the right one by name.
Error 401 Unauthorized
Credentials weren't sent or aren't valid. With a token, check that the header is
Authorization: Bearer <TOKEN_SENTL>. With OAuth, sign in again from the client: the session
may have expired, and a login unused for 30 days always has to be repeated.
The assistant says it can't do something
The connection works, but Sentl refused that specific action and the assistant reports the reason. The most common ones:
- Insufficient permissions: in that project's organization your role is User. Ask an Owner or Admin there to change your role or to take the action.
- Insufficient credits: the run costs more credits than the organization has left (the message shows both numbers). Top up that organization's credits, or lower the rounds or the models.
- Subscription not active: the organization's subscription must be reactivated before starting new runs.
- Run already in progress: the project already has an open run, and Sentl doesn't start a second one. The message names the open run: ask the assistant to follow that one and start a new run once it has finished. A run that stops making progress is closed automatically after a while, with a warning that explains what happened.
- Project setup incomplete: the project can't run yet, and the message says what's missing: at least one researcher model, or at least one active question. Add it, then start the run again.
- Project or run not found: it doesn't exist, or it belongs to an organization you're not a member of.
I don't see the write tools
That's expected if you're a User in all your organizations. Write tools appear as soon as you're Owner or Admin in at least one.
Error 405 Method Not Allowed
The client is probably using the endpoint as a generic URL. Configure it as an HTTP MCP server.
The assistant doesn't see the data I expect
The connection sees all the organizations you belong to: if something is missing, you're almost always not a member of the organization that contains it, or the project is archived. Ask the assistant to list your organizations to see what it can actually reach.
Frequently asked questions
OAuth login or token: which is better?
They're equally supported: choose based on your client. If it supports OAuth, login is more convenient (no token to manage); otherwise use a token.
With OAuth login, do I need to paste a token?
No. Just enter the server URL and complete access with login and consent in the browser.
Can I connect more than one AI assistant?
Yes. Authorize each client via OAuth or create a separate token for each one.
Can I use the same connection for several organizations?
Yes. A connection (OAuth or token) works across all the organizations you belong to, with the permissions of your role in each. If you join a new organization, the connection sees it right away.
Can the AI assistant change my data without permission?
Changes are only allowed with write permissions, usually for Owner and Admin. Many AI clients also ask for confirmation before running tools that change data.
Should I create a token with an expiry date?
It's not required, but it's recommended. An expiry date reduces the risk if the token gets copied to the wrong place.